I have created a photo archive of the railroad. This will be where I put all of my railroad pictures. Even the boring ones :)
Feel free to browse: http://s1163.photobucket.com/albums/q542/PHRMRR/
Sunday, March 11, 2012


Progress and seeing a light at the end of the tunnel
Been awhile since I updated on the status of the railroad. This is par for my writing style. I sort of produce in spurts.
So, as of early March the railroad looks like this:
The Farm

Rivermont

The back area

Pine Hollow

Putting all of the buildings and some people on the layout sure brought it to life and showed what I have in store for me. I also took some time and painted the roads a nice "blacktop" color to a) get rid of the blue adn b) sort of show me what was going to be what. Just that one step did wonders!
We are continuing to make little tweaks here and there as I go along. For example, I needed a concrete "pad" for my Fire Department. My attempt at spackle to make a large "concrete" area didn't work so well so I went out and got some SmoothIT to try. This product is touted as the easiest way to make roads so I figured what better way to do concrete areas. And it lives up to its name, but it's pricey at nearly $10 for a quart which makes about a 15' x 3" swath. Using it to make all of the roads and parking lot, sidewalk areas would get HUGELY costly. But after using it, it seems to be just a plaster formulation so I'm going to do my next attempt using the plaster of paris I have on hand. At about $10 or so for a 25 pound bag that is MUCH less expensive.
So anyway, here is the Fire Department pad (rats I don't have an updated picture of it sanded and colored. Have to add that in another post). So here I have a raised concrete pad under the building. To the left that area will get another poured section to be painted black for a parking area. I also took a moment to test scenik a small section of track in front of the building. I think it turned out fairly well. It is a section of sculpting plaster that dries looking like granular rock. Over that is the base layer of "turn" and some coarser area to look like brush just growing wild along the section.

And here is the other major concrete area I put down. This one didn't come out as well as I would have liked and I'll have to touch it up.

And one of the reasons that it is exciting to me to get the buildings and items on the layout. When you get the camera down to their level it looks real :) That is so neat. Been a long time coming.


Till next time I'm still working.
So, as of early March the railroad looks like this:
The Farm

Rivermont

The back area

Pine Hollow
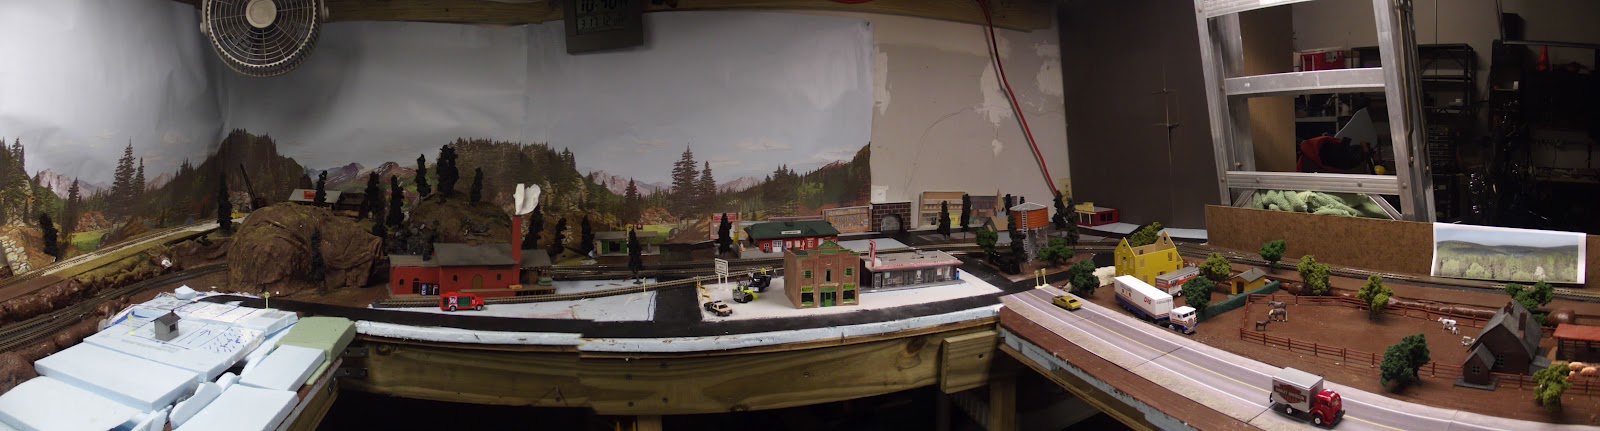
Putting all of the buildings and some people on the layout sure brought it to life and showed what I have in store for me. I also took some time and painted the roads a nice "blacktop" color to a) get rid of the blue adn b) sort of show me what was going to be what. Just that one step did wonders!
We are continuing to make little tweaks here and there as I go along. For example, I needed a concrete "pad" for my Fire Department. My attempt at spackle to make a large "concrete" area didn't work so well so I went out and got some SmoothIT to try. This product is touted as the easiest way to make roads so I figured what better way to do concrete areas. And it lives up to its name, but it's pricey at nearly $10 for a quart which makes about a 15' x 3" swath. Using it to make all of the roads and parking lot, sidewalk areas would get HUGELY costly. But after using it, it seems to be just a plaster formulation so I'm going to do my next attempt using the plaster of paris I have on hand. At about $10 or so for a 25 pound bag that is MUCH less expensive.
So anyway, here is the Fire Department pad (rats I don't have an updated picture of it sanded and colored. Have to add that in another post). So here I have a raised concrete pad under the building. To the left that area will get another poured section to be painted black for a parking area. I also took a moment to test scenik a small section of track in front of the building. I think it turned out fairly well. It is a section of sculpting plaster that dries looking like granular rock. Over that is the base layer of "turn" and some coarser area to look like brush just growing wild along the section.

And here is the other major concrete area I put down. This one didn't come out as well as I would have liked and I'll have to touch it up.

And one of the reasons that it is exciting to me to get the buildings and items on the layout. When you get the camera down to their level it looks real :) That is so neat. Been a long time coming.


Till next time I'm still working.
Tuesday, February 21, 2012
A view to a Railroad
So, the Board of Directors met and have decided that its not so easy planning on just plain blue. So by unanimous resolution they have opted to build the towns and farm and other material - just to provide some backdrop to the planning that is ongoing.
Also resolved was to remove the mountain in front of the Saw Mill - dump truck by dump truck if necessary. Mr. Johnson provided a very clear case why his visibility should not be cut off (mostly consisted of a lot of "Well, just because" arguments).
So in order to get an idea of where the Railroads progress was the Board commissioned a series of sureys to document progress of the building.


The series provided the Board with sufficient information to move forward with construction. Of course the Chief Engineer had to remind the board that there was still the issue of power and track cleanliness, and until that had been resolved there would not be a lot of "railroad work" taking place on the lines. So, while grumbling, the Board approved the plan to continue track work until such time as they could be guaranteed a full reliable circuite around the track at will by the engines. Until that time any true "fun" work would have to wait.
Meeting adjourned with everyone admiring the plans.
Also resolved was to remove the mountain in front of the Saw Mill - dump truck by dump truck if necessary. Mr. Johnson provided a very clear case why his visibility should not be cut off (mostly consisted of a lot of "Well, just because" arguments).
So in order to get an idea of where the Railroads progress was the Board commissioned a series of sureys to document progress of the building.


The series provided the Board with sufficient information to move forward with construction. Of course the Chief Engineer had to remind the board that there was still the issue of power and track cleanliness, and until that had been resolved there would not be a lot of "railroad work" taking place on the lines. So, while grumbling, the Board approved the plan to continue track work until such time as they could be guaranteed a full reliable circuite around the track at will by the engines. Until that time any true "fun" work would have to wait.
Meeting adjourned with everyone admiring the plans.
Sunday, February 19, 2012
My Parking Lot
While attempting to fix some of the saw mill "problems" I came across an idea to build parking lots from spackle. There are products out there to actually "create" parking lots and roads from material that dries into a hard plaster like surface, I can't afford to buy the multiple containers of it to meet the needs of all my roads and parking lots. So I decided to see what the spackle would do.
On the sawmill scene I used the spackle to act as a surface from the saw exit down to the drying shed and then up and around where loading would take place. Frankly given the state of my landscape I just coulnd't seem them moving a forklife over the ground. Thus my "concrete."
So in the picture here we see the material placed outside the exit from the saw area. This is where the lumber would be moved to stack it in preparation for the forklift to move it down to the drying shed. I scored in some lines and added some fine "earth" to try to have it look like there are weeds growing in it. Once it dries completely and I take a fine sandpaper to it and get some concreate color to it, hopefully it will look like that.

This is a picture of the full concreate application. Around the saw mill itself to the door of the drying shed and up to the car loading area. Have to see how this turns out.

In the meantime I also tried to create a much larger parking lot. This time I took an entire block where the gas station and 7-11 will be sitting and did a similar treatment. This time I laid out some popsicle sticks to provide a uniform depth and simulate a curb. I placed the buildings in the goop to get a placement and then removed them. Removing the spackle where the buildings will sit allows me to run wires and place lights into the buildings. Once I had an idea of where the buildings would go (and the driveways) I put in some styrne sheet sidewalk. However, as I was drafting this I realized I didn't leave enough space for the frontage of the 7-11 to have two entrances :( Oh well. I will get it fixed.

And this gives an idea of the finished product, or the promise of a finished product. I'm pretty sure it won't be pink.

On the sawmill scene I used the spackle to act as a surface from the saw exit down to the drying shed and then up and around where loading would take place. Frankly given the state of my landscape I just coulnd't seem them moving a forklife over the ground. Thus my "concrete."
So in the picture here we see the material placed outside the exit from the saw area. This is where the lumber would be moved to stack it in preparation for the forklift to move it down to the drying shed. I scored in some lines and added some fine "earth" to try to have it look like there are weeds growing in it. Once it dries completely and I take a fine sandpaper to it and get some concreate color to it, hopefully it will look like that.

This is a picture of the full concreate application. Around the saw mill itself to the door of the drying shed and up to the car loading area. Have to see how this turns out.

In the meantime I also tried to create a much larger parking lot. This time I took an entire block where the gas station and 7-11 will be sitting and did a similar treatment. This time I laid out some popsicle sticks to provide a uniform depth and simulate a curb. I placed the buildings in the goop to get a placement and then removed them. Removing the spackle where the buildings will sit allows me to run wires and place lights into the buildings. Once I had an idea of where the buildings would go (and the driveways) I put in some styrne sheet sidewalk. However, as I was drafting this I realized I didn't leave enough space for the frontage of the 7-11 to have two entrances :( Oh well. I will get it fixed.

And this gives an idea of the finished product, or the promise of a finished product. I'm pretty sure it won't be pink.

Been Awhile
Posting has been sparse due to work and a labor strike. Apparently the engineers decided that it was too much trouble to work on a railroad that permitted dirty tracks and dirty locomotive wheels. So they decided to go on strike and simply stop working under those arduous conditions.
Despite attempts to appease them, the strike continued. Therefore management felt no option but to deal with those issues in true Ronald Regan fashion, we fired the engineers and found some who would be willing to work and not try to break the railroads bank. Unfortunately the new workers immediately joined the union and the same pressure came on. So we had to figure out how to resolve the probelms.
After quite some effort, we believe we have found the solution. Of course the challenge is now being able to get enough gang laborers scrubbing track and engine wheels to meet our desired deadlines. So far its not looking very good.
In the meantime, we have a pair of pictures that show the state of the RR progress to date. Excuse the mess - we are actually still very much under construction.


So labor issues resolved (at least in terms of recognizing the problem and working toward a solution) work picked up again. We are pleased to announce that the corner where the sawmill will be has been (for the most part) senicked and actually looks like real land. While there is a bit more landscaping and some track ballasting that must be done before the next stage, for the most part it is complete.

Of course the challenge is that it will be "lost" in the corner once the tunnel and mountain are installed in front of it. This is a conceptual photograph of how it will look.

As you can see it sort of "disappears" into the corner. Train operations to pick up the sawn lumber will have to be observed by looking up the line.

Until next time.
Cheers!
Despite attempts to appease them, the strike continued. Therefore management felt no option but to deal with those issues in true Ronald Regan fashion, we fired the engineers and found some who would be willing to work and not try to break the railroads bank. Unfortunately the new workers immediately joined the union and the same pressure came on. So we had to figure out how to resolve the probelms.
After quite some effort, we believe we have found the solution. Of course the challenge is now being able to get enough gang laborers scrubbing track and engine wheels to meet our desired deadlines. So far its not looking very good.
In the meantime, we have a pair of pictures that show the state of the RR progress to date. Excuse the mess - we are actually still very much under construction.


So labor issues resolved (at least in terms of recognizing the problem and working toward a solution) work picked up again. We are pleased to announce that the corner where the sawmill will be has been (for the most part) senicked and actually looks like real land. While there is a bit more landscaping and some track ballasting that must be done before the next stage, for the most part it is complete.

Of course the challenge is that it will be "lost" in the corner once the tunnel and mountain are installed in front of it. This is a conceptual photograph of how it will look.

As you can see it sort of "disappears" into the corner. Train operations to pick up the sawn lumber will have to be observed by looking up the line.

Until next time.
Cheers!
Thursday, January 5, 2012
New Year - New Plan
It is nearly a week into the new year and, as I'm guessing you figured from the title, I changed my mind over the holidays. As I sat there looking at my layout I realized that I really didn't like the small yard I was confronted with. Operations notwithstanding, the yard needed more room for my limited rolling stock.
So I went back to the drawing board, talked it over with the Head of Domestic Operations and did some land surveying - the railroad will be breaking ground on a southern yard shortly after operations commence in the near future. In the meantime the land that was going to be used has been turned back over to the county for improvement and the decisions on what to build there have not been concluded.
Once that decision was made the Road Department begain laying track based on the new format. So far nearly 75% of the rail has been laid. Operations are ongoing to surecure the sub-roadbed and build up the mainline to meet standards. Additionally terraforming operations have taken place and the lake has been fully excavated as well as beginnings of the upper land elevations.
On that note, the company has agreed to extend the upper level to the sourtheast in hopes of a future expansion into the unexplored reagions of the external areas.
Photos will be provided soon
Here is an overview of the new layout.

So I went back to the drawing board, talked it over with the Head of Domestic Operations and did some land surveying - the railroad will be breaking ground on a southern yard shortly after operations commence in the near future. In the meantime the land that was going to be used has been turned back over to the county for improvement and the decisions on what to build there have not been concluded.
Once that decision was made the Road Department begain laying track based on the new format. So far nearly 75% of the rail has been laid. Operations are ongoing to surecure the sub-roadbed and build up the mainline to meet standards. Additionally terraforming operations have taken place and the lake has been fully excavated as well as beginnings of the upper land elevations.
On that note, the company has agreed to extend the upper level to the sourtheast in hopes of a future expansion into the unexplored reagions of the external areas.
Photos will be provided soon
Here is an overview of the new layout.

Monday, December 26, 2011
Land acquisition for layout
I just realized that I did not do my due diligence for public notices of land acquisition for the RR. Shame on me, but with the right of eminent domain - who cares :)
So, earlier in this notices I did post a plan showing how I would run the railroad. Double track mainline wiht a crossover near the farm to let trains switch lines. However, an ongoing conversation with a fellow RR-er provided me with a grain for thought. After some consideration I agreed and adjusted my plans from a double track main (and subsequent reduction of space) to a single track main withe a viable (albeith smallish) yard for forming trains and storing rolling stock. I'm sure at some point I'll have to do some more planning and land acquisition for either second yard or a replacement, but in the interim this one should work very well.

Actually if you compare this layout to the pictures in the previuos post you can get a pretty good idea of how things will layout. Operationally, we'll see :)
So, earlier in this notices I did post a plan showing how I would run the railroad. Double track mainline wiht a crossover near the farm to let trains switch lines. However, an ongoing conversation with a fellow RR-er provided me with a grain for thought. After some consideration I agreed and adjusted my plans from a double track main (and subsequent reduction of space) to a single track main withe a viable (albeith smallish) yard for forming trains and storing rolling stock. I'm sure at some point I'll have to do some more planning and land acquisition for either second yard or a replacement, but in the interim this one should work very well.

Actually if you compare this layout to the pictures in the previuos post you can get a pretty good idea of how things will layout. Operationally, we'll see :)
Life in a blue land
Christmas was good to the RR. Kathy and I actually got pretty excited after getting a hint at what the future holds.
Santa indulged my latest hobby and brought me a new locomotive (Amtrak #104 an F-7A), a flat care that works (the ohter one from E-bay is just way too light I think) and a track cleaning car that I wanted. Also I was surprised with some benches (to match the ones I got for her :) err him), a water tower and, best of all - a package of trees.
So I went down and tried to imagine what was coming. Below are the pictures that show the future of the railroad.
Passenger service:


The Farm:

And a hint of the "hidden" details that will end up all over this layout when I get done (whenever that may be)

Now if you'll excuse me, I have to go place a help wanted sign for railroad laborers to get this track work completed.
Santa indulged my latest hobby and brought me a new locomotive (Amtrak #104 an F-7A), a flat care that works (the ohter one from E-bay is just way too light I think) and a track cleaning car that I wanted. Also I was surprised with some benches (to match the ones I got for her :) err him), a water tower and, best of all - a package of trees.
So I went down and tried to imagine what was coming. Below are the pictures that show the future of the railroad.
Passenger service:
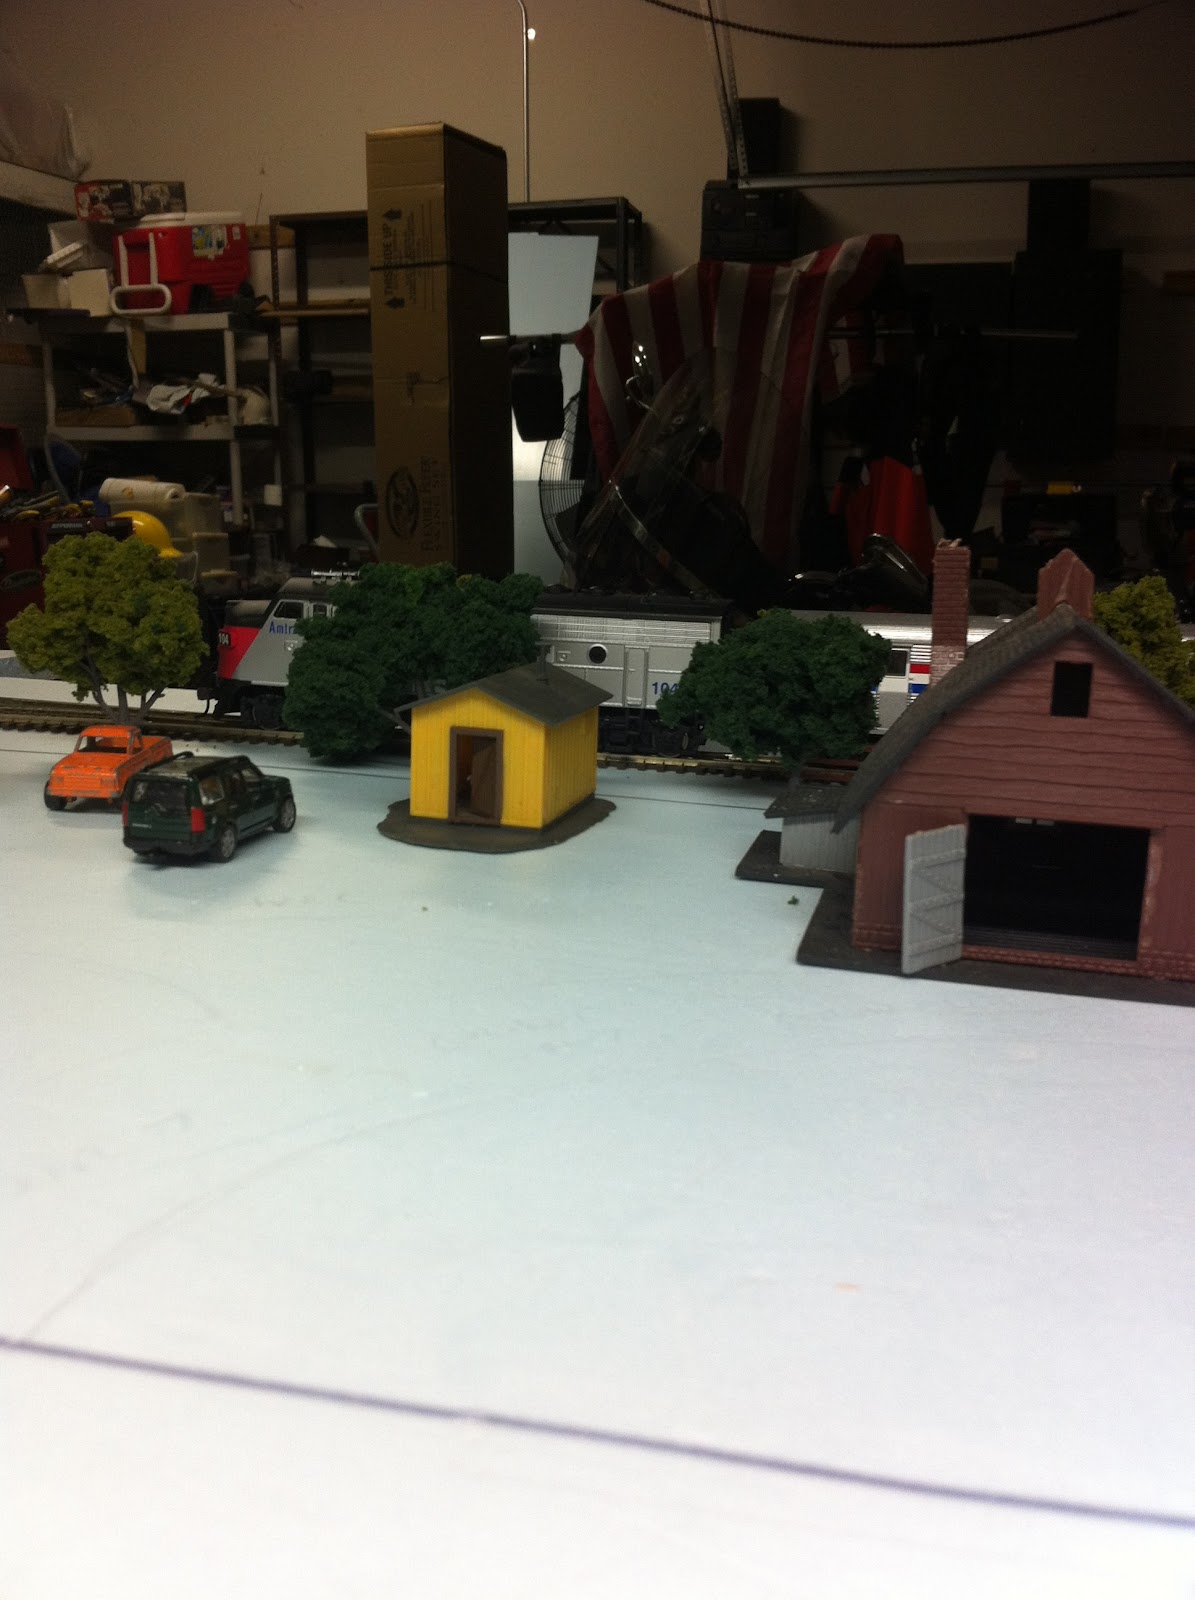


The Farm:

And a hint of the "hidden" details that will end up all over this layout when I get done (whenever that may be)

Now if you'll excuse me, I have to go place a help wanted sign for railroad laborers to get this track work completed.
Sunday, December 11, 2011
Railroad history in my backyard
Today while perusing various videos about trains I cam across a You Tube videographer who has many video's covering railfanning Northern Florida. Throughout his videos he refers to the "A" line and the "S" line as it travels these areas. Well I live on the "A" line. I can literally hear the trains as they travel a couple of hundred yards outslide my backyard. Unfortunatly the woods are so thick I can't see them.
Well I got curious and was looking for a track map of the "A" line. Came to find out it is called this since it used to belong to the Atlantic Coastal Railroad which ran from Richmond to Tampa. The interesting tidbit is this was the turn of the century. I live next to a railroad trackbed that has been working for over 110 years.
How cool is that?
Well I got curious and was looking for a track map of the "A" line. Came to find out it is called this since it used to belong to the Atlantic Coastal Railroad which ran from Richmond to Tampa. The interesting tidbit is this was the turn of the century. I live next to a railroad trackbed that has been working for over 110 years.
How cool is that?
Running Trains
Well this weekend has been busy. And, in a word, satisfying. I actually have track down and running trains. Admittedly not all the way around - but they are running.
I begain laying track using the plan and as usual fo rme, it gradually diverted into something that was similar but workable. I found out that the yard layout didn't quite fit. So I did some adjustment and viola - working yard. Laid out the other parts and got it down to where I had most of the track in place and I could see how it would be functioning.
So today, I went back to fill in some spots and actually hooked up my NCE Power Cab. With relatively easy steps I had power on the track and a running locomotive. For all of two sections. Then quiet. Seems that I had forgotten my lessens of the table. Always use two track joiners, otherwise you run out of signal and power.
So I spent a little bit of time fixing thd missing joiners. Using my locomotive as a sort of inch-by-inch failure indicator. When the train stopped moving I looked for a gap. Worked like a charm.
This afternoon I tried to make up a train and function per my plan. Found out that I could not even get a four car train hooked up and out to the main track. It was too long and blocked the turnouts. So I thought and ended up pulling track and relaying a section so that I had a forward moving outlet from the yard to the outside track. This will let me get a "full size" train out of the yard and onto the moving track. We'll see how it works out.
I still have about 4 feet of gaps that need to be filled - but I'm much closer than I was yesterday. Now I can run about 85% of one track without a glitch.
That is great progress!
Friday, December 9, 2011
Dec 6th
Another day, another layout. I still need to plan structures and such things, but this layout will give me a complete yard as opposed to just some spurs. I'm hoping this one will work out as I really like this.


On the way home this evening I bought 3/4ths of my crossover. I created a crossover using #8 turnouts and they had two rights but only 1 left. So I sort of have to wait till I get the last piece to built it. But I have most of it.
So at this point I think I have settled on a plan and will start laying the track. If I get to the crossing then I can simply plug most of what I can and leave that corner alone till I get it. I'm hoping that by New Year's I'll have enough started to begin running trains along the lines.
The open question is whether I will be laying directly on the plywood or lay down some blue foam and use that as the base. In all probabilities it will be onto the foam. No matter which way, once I have the track down "for good" I will start the terraforming and begin section by section work to develop the tables into a real world. I believe I'm going to start with the freight yard. Then to the Farm, the town and the yards.
Dec 5th Notes
I can't leave well enough alone :). I didn't like the previous plan so I drew up another. The largest challenge was getting the track elevated over itself and having everything line item. Also there was some issues about getting all of my structures in place.

So I separated the pieces into unique areas. Two separate tracks traveling from one table to another. The left is the yards, the rear table is a freight/industrial area with a couple of motorcycle buildings. . The right table is undeveloped town area with passenger service. The front table is my farm area with a crossover area in it to allow movement from one line to the other.

I am currently undecided if I will be creating a tunnel on the front table or not. The town area will have a river with a bridge crossing.
Dec 4th Notes
Dec 4th, I built the front and back tables by simply "hanging" wood across the gaps from left to right. The rear table I under slung two 1x4's and used Styrofoam on top as a "filler" to make up the table. The front table I screwed in two 1x4's (left/right) and placed a plywood section across as the table foundation.
After looking at them and doing some smudging around I have decided to NOT keep the rear table as it is. Its too fragile and won't work for what I want.
However, by putting the tables in place I was able to get some accurate measurements of the table sizes.
The left and right tables are 8 feet top to bottom and 30" side to side. The front/back are 54" across and on the order of 24" in width. There is a 7" indentation to give me room to insert the ladder so we can access the "attic" space we built in the garage.
Overall I think I have about 18 feet of one way runable track. Actually may be a bit more, but that's close enough. So using the "actual" dimensions I opened my Anyrail software and began to adjust my track layout to be sure that I had sufficient space for what I wanted to do.
I am using the same general concept that I had gone into this with, a rail yard for building trains, separate freight house area, a town and a separate farm area. But I'm going to be using a single track to conserve table space. One track departs the yard, goes past the freight yard, through town, past the farm, over the yard line and back around to the town for the passenger terminal stop and return to the yards. One long single track, double pass for a single path.
This plan will provide an elevated section of track that will support some "hill work" on the layout.
Dec 3rd notes
Today (Dec 3rd) I broke my original table apart and built two side tables out of the wood (with some new stuff added to make the 2nd table). Both of these tables were mounted to the wall, screwed into studs and are not going anywhere.
Pictures of my first table.
So, going back a month of so I had determined to build a model railroad table. I went through several iterations of what type, where, etc. I decided upon a 4x8 table (sheet of plywood) and ended up with a 5x8 (sheet of plywood and a little bit). Following what I thought was reasonalbe guidelines I built it wiht 48" legs. HOwever, when I was done I actually ended up with a 51" table top.

I had to build a step bench just to get my granddaughters head to the table top.

So with this table I put styrofoam on top and laid down track and started to layout the buildings and scenes. This is what it looked like.


However, this is what was. Based on some input from someone on a forum I subscribed to, and based upon some reviews of what this table was capable of and what I wanted. This table has been broken down and another resurrected in its place.

I had to build a step bench just to get my granddaughters head to the table top.


However, this is what was. Based on some input from someone on a forum I subscribed to, and based upon some reviews of what this table was capable of and what I wanted. This table has been broken down and another resurrected in its place.
Introduction
I have been an off/on modeler since I was a kid. There is a picture of me floating around in some box somewhere of me in my bed with what looks to be nearly a dozen model airplanes hanging from the ceiling over my bed. Today, in fact, I have some store purchased larger airplanes haning from my office ceiling as well :)
I have always been attracted to models. But in no way would I consider myself to be a master modeler. It was something I enjoyed doing. Taking a box of plastic parts and making someting recognizable out of it.
So for quite some time I have thought about model trains. Just never had the impetus to get invovled. Always too much else to do. Well over the last year I had a health hit and I'm not as mobile as I used to be. Couple that with some "extra" cash (as if anyone had any extra) and I took a plunge. I'm still sliding :)
I used to think my motorcycle riding was an offshoot of a lifestyle choice - no matter how much on the periphery. I'm coming to think the same of the model railroad hobby.
This blog will be a record (mainly for myself) of my "journey" into the world of model trains. It will show the progression of my layout, the terrain and "terra forming" that goes into it, as well as any modeling needed to make some of hte structures. From what I have seen so far, the true "modeling" is in bringing the layout to life. We'll have to see how that goes.
Oh and the best part of this journey? I am taking it with my wife. She is just as enthusiastic about making this (albeit probably NOT for the same reasons) as I am. She is looking forward to building some houses and planning the more "social" aspects of the modeling side. I think this will become her "doll house" creativity process. Either way it is great to have a partner working with me. Means there isn't so much argument in getting those little extras :)
I have always been attracted to models. But in no way would I consider myself to be a master modeler. It was something I enjoyed doing. Taking a box of plastic parts and making someting recognizable out of it.
So for quite some time I have thought about model trains. Just never had the impetus to get invovled. Always too much else to do. Well over the last year I had a health hit and I'm not as mobile as I used to be. Couple that with some "extra" cash (as if anyone had any extra) and I took a plunge. I'm still sliding :)
I used to think my motorcycle riding was an offshoot of a lifestyle choice - no matter how much on the periphery. I'm coming to think the same of the model railroad hobby.
This blog will be a record (mainly for myself) of my "journey" into the world of model trains. It will show the progression of my layout, the terrain and "terra forming" that goes into it, as well as any modeling needed to make some of hte structures. From what I have seen so far, the true "modeling" is in bringing the layout to life. We'll have to see how that goes.
Oh and the best part of this journey? I am taking it with my wife. She is just as enthusiastic about making this (albeit probably NOT for the same reasons) as I am. She is looking forward to building some houses and planning the more "social" aspects of the modeling side. I think this will become her "doll house" creativity process. Either way it is great to have a partner working with me. Means there isn't so much argument in getting those little extras :)
Subscribe to:
Posts (Atom)